Showing posts with label fedora. Show all posts
Showing posts with label fedora. Show all posts
0
Fedora 11 has been released for a while now. The upgrade from my Fedora 10 installation was relatively pain-free and Fedora 11 runs happily on my system. Upgrading did not bring any stunning revolutions and, as I'm not using ext4 yet, the most noticeable change from my point of view is certainly the 20 seconds start-up.
Now, some forewords of wisdom...
WARNING1: It is not possible to upgrade directly from Fedora 9 to Fedora 11. You must upgrade to Fedora 10 first. Do not attempt an upgrade from Fedora 9 to Fedora 11!
WARNING2: Make sure you backup important data before you upgrade. It does have to be complicated: use rsync or tar to do this.
WARNING3: The yum update step should NOT run inside a graphical session (Gnome or KDE or whatever you favorite GDM is). This could result in a unusable install. Updates should be run in a vty, runlevel 3, or a screen session.
That being said, let's get into the details!
1. Prepare for the upgrade
First we need to upgrade the RPM package via yum update rpm. During this step, I encountered the error:
The solution was to clean up the install *manually* prior to updating RPM:
If you notice that a new kernel got installed during yum -y update, you have to reboot the system. After the reboot, log in as root again either directly or via sudo.
Finally, we need to clean the yum cache:
2. Upgrade
Here is the upgrade process itself. We can do this with preupgrade, which will also take care of your RPMFusion packages and start a nice handy GUI. Install preupgrade, then start the utility:
The preupgrade wizard will then start... Just follow the indications of the screen and you'll be off with a flashy new Fedora 11 installation!
Fedora 11 has been released for a while now. The upgrade from my Fedora 10 installation was relatively pain-free and Fedora 11 runs happily on my system. Upgrading did not bring any stunning revolutions and, as I'm not using ext4 yet, the most noticeable change from my point of view is certainly the 20 seconds start-up.
Now, some forewords of wisdom...
WARNING1: It is not possible to upgrade directly from Fedora 9 to Fedora 11. You must upgrade to Fedora 10 first. Do not attempt an upgrade from Fedora 9 to Fedora 11!
WARNING2: Make sure you backup important data before you upgrade. It does have to be complicated: use rsync or tar to do this.
WARNING3: The yum update step should NOT run inside a graphical session (Gnome or KDE or whatever you favorite GDM is). This could result in a unusable install. Updates should be run in a vty, runlevel 3, or a screen session.
That being said, let's get into the details!
1. Prepare for the upgrade
First we need to upgrade the RPM package via yum update rpm. During this step, I encountered the error:
[nicolas@munin /TEMP]# yum update rpm
(...)
rpmdb: Program version 4.7 doesn't match environment version 4.5
error: db4 error(-30971) from dbenv->open: DB_VERSION_MISMATCH:
Database environment version mismatch
(...)
(...)
rpmdb: Program version 4.7 doesn't match environment version 4.5
error: db4 error(-30971) from dbenv->open: DB_VERSION_MISMATCH:
Database environment version mismatch
(...)
The solution was to clean up the install *manually* prior to updating RPM:
yum clean all
rm -f /var/lib/rpm/__db*
rpm --rebuilddb
yum -y update
yum update rpm
rm -f /var/lib/rpm/__db*
rpm --rebuilddb
yum -y update
yum update rpm
If you notice that a new kernel got installed during yum -y update, you have to reboot the system. After the reboot, log in as root again either directly or via sudo.
Finally, we need to clean the yum cache:
yum clean all
2. Upgrade
Here is the upgrade process itself. We can do this with preupgrade, which will also take care of your RPMFusion packages and start a nice handy GUI. Install preupgrade, then start the utility:
yum install preupgrade
preupgrade
preupgrade
The preupgrade wizard will then start... Just follow the indications of the screen and you'll be off with a flashy new Fedora 11 installation!
1
For a while now, I've been searching documentation about Solid State Drives (SSD). They are still quite expensive when compared to traditional SATA drives - 40 times more expensive in fact :), but they offer good performances and as their prices will keep falling down, they will make a better alternative. Among other advantages, they are shock-resistant, consume less resources than traditional HD and have very fast access times.
My X300 is currently fitted with a 64GB Samsung SSD that works fine with either Fedora or Ubuntu. That said, the performance and life expectency of an SSD drive can be significantly improved by a few tweaks.
1. Mount volumes using the noatime option
By default on Linux, the last accessed time of files will be logged. All these additional write operations can reduce the life of the disk. The noatime mount option will turn this off. Most Linux distros use the relatime option by default. For your SSD partitions (presumably formatted as ext3), replace relatime with noatime in /etc/fstab.
PS: you need a reboot for these changes to take effect.
2. Change the I/O scheduler
The default I/O scheduler in Linux is cfq, which stands for "completely fair queuing". It works quite well with standard HD but since SSDs are a different sort of beast, noop or deadline are probably more suited to them.
Personally, I've opted for noop. Simply added “elevator=noop” to the kernel parameters in my boot loader’s config file - typically /boot/grub/menu.lst. Here is the Fedora section on my laptop:
Once again, this type of change need a restart to be fully effective.
3. Prefer ramdisk for temporary filesystems
This is something I've been using for a while, even with standard HD, for machines where the amount of available RAM is important. For standard HD, the reasoning was that reading the RAM was faster than reading the disk. With SSD, this performance argument can be discussed, but still, you will increase your disk's life expectancy by moving temporary filesystems that are frequently read to the RAM. Another advantage is that these filesystems are removed then re-mounted at every reboot, meaning that you are less likely to have to clean them up manually.
Again, the changes are to be made in /etc/fstab. Here is a sample from my Ubuntu fstab:
Limiting the size of these tmpfs directly in /etc/fstab is likely a bit of an overkill, but these temporary filesystems (especially /tmp) can be filled up pretty quickly (by an application core dump for instance) and you surely don't want to see all your RAM eaten up in such case...
For a while now, I've been searching documentation about Solid State Drives (SSD). They are still quite expensive when compared to traditional SATA drives - 40 times more expensive in fact :), but they offer good performances and as their prices will keep falling down, they will make a better alternative. Among other advantages, they are shock-resistant, consume less resources than traditional HD and have very fast access times.
My X300 is currently fitted with a 64GB Samsung SSD that works fine with either Fedora or Ubuntu. That said, the performance and life expectency of an SSD drive can be significantly improved by a few tweaks.
1. Mount volumes using the noatime option
By default on Linux, the last accessed time of files will be logged. All these additional write operations can reduce the life of the disk. The noatime mount option will turn this off. Most Linux distros use the relatime option by default. For your SSD partitions (presumably formatted as ext3), replace relatime with noatime in /etc/fstab.
PS: you need a reboot for these changes to take effect.
2. Change the I/O scheduler
The default I/O scheduler in Linux is cfq, which stands for "completely fair queuing". It works quite well with standard HD but since SSDs are a different sort of beast, noop or deadline are probably more suited to them.
Personally, I've opted for noop. Simply added “elevator=noop” to the kernel parameters in my boot loader’s config file - typically /boot/grub/menu.lst. Here is the Fedora section on my laptop:
title Fedora Core 10
root (hd0,0)
kernel /vmlinuz-2.6.27.21-170.2.56.fc10.x86_64 ro rhgb quiet elevator=noop
initrd /initrd-2.6.27.21-170.2.56.fc10.x86_64.img
quiet
root (hd0,0)
kernel /vmlinuz-2.6.27.21-170.2.56.fc10.x86_64 ro rhgb quiet elevator=noop
initrd /initrd-2.6.27.21-170.2.56.fc10.x86_64.img
quiet
Once again, this type of change need a restart to be fully effective.
3. Prefer ramdisk for temporary filesystems
This is something I've been using for a while, even with standard HD, for machines where the amount of available RAM is important. For standard HD, the reasoning was that reading the RAM was faster than reading the disk. With SSD, this performance argument can be discussed, but still, you will increase your disk's life expectancy by moving temporary filesystems that are frequently read to the RAM. Another advantage is that these filesystems are removed then re-mounted at every reboot, meaning that you are less likely to have to clean them up manually.
Again, the changes are to be made in /etc/fstab. Here is a sample from my Ubuntu fstab:
$ grep tmpfs /etc/fstab
tmpfs /tmp tmpfs defaults,noatime,mode=1777,size=1024M 0 0
tmpfs /var/tmp tmpfs defaults,noatime,mode=1777,size=512M 0 0
tmpfs /tmp tmpfs defaults,noatime,mode=1777,size=1024M 0 0
tmpfs /var/tmp tmpfs defaults,noatime,mode=1777,size=512M 0 0
Limiting the size of these tmpfs directly in /etc/fstab is likely a bit of an overkill, but these temporary filesystems (especially /tmp) can be filled up pretty quickly (by an application core dump for instance) and you surely don't want to see all your RAM eaten up in such case...
0
But it's probably worth another separate post...
It still evolves around the topic of configuring the "how wonderful!" middle button horizontal scrolling. I was not so sure how I had worked it out on Fedora 10, so I just rebooted to this OS and confirmed that the tweak with the "mouse" driver does not work on this distro. As said below, it *does* work with Fedora 9 though. What happens is that this button is "emulated" via HAL. No point looking for the xorg.conf file as there should not be any such file...
To configure the TrackPoint scroll, you have to:
1. Edit the config file /usr/share/hal/fdi/policy/10osvendor/10-x11-input.fdi
Basically, just add lines similar to the following in the relevant part of the file:
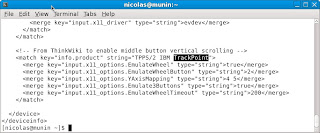 ... by relevant, I mean you'll have to make sure you're in the correct section of the file as markup languages are sensitive to that... If you don't see what this means, have a look at the markup language article on Wikipedia.
2. Then restart HAL and check the modifications appear among the
device options that you can check via the output of lshal. Typically:
[nicolas@munin ~]$ lshal | grep TrackPoint
info.product = 'TPPS/2 IBM TrackPoint' (string)
input.product = 'TPPS/2 IBM TrackPoint' (string)
3. Finally restart the X server and enjoy some nice and smooth vertical scrolling!
NDLR: once again, from the above extract you'll notice the FDI file does not enable horizontal scrolling... same reason as below: Firefox would understand it has a backward/forward instruction...
For reference, here is the original article on Thinkwiki.
I am also aware that it used to *not* work on earlier versions of evdev, so you'll have to make you run at least version 2.1.
Posted on 4/26/2009 05:34:00 pm by Nicolas and filed under
fedora,
how-to,
linux,
open source,
trackpoint,
X300
It's a sort of edit to my previous post - see just below for the original story ;)But it's probably worth another separate post...
It still evolves around the topic of configuring the "how wonderful!" middle button horizontal scrolling. I was not so sure how I had worked it out on Fedora 10, so I just rebooted to this OS and confirmed that the tweak with the "mouse" driver does not work on this distro. As said below, it *does* work with Fedora 9 though. What happens is that this button is "emulated" via HAL. No point looking for the xorg.conf file as there should not be any such file...
To configure the TrackPoint scroll, you have to:
1. Edit the config file /usr/share/hal/fdi/policy/10osvendor/10-x11-input.fdi
Basically, just add lines similar to the following in the relevant part of the file:
 ... by relevant, I mean you'll have to make sure you're in the correct section of the file as markup languages are sensitive to that... If you don't see what this means, have a look at the markup language article on Wikipedia.
2. Then restart HAL and check the modifications appear among the
device options that you can check via the output of lshal. Typically:
[nicolas@munin ~]$ lshal | grep TrackPoint
info.product = 'TPPS/2 IBM TrackPoint' (string)
input.product = 'TPPS/2 IBM TrackPoint' (string)
3. Finally restart the X server and enjoy some nice and smooth vertical scrolling!
NDLR: once again, from the above extract you'll notice the FDI file does not enable horizontal scrolling... same reason as below: Firefox would understand it has a backward/forward instruction...
For reference, here is the original article on Thinkwiki.
I am also aware that it used to *not* work on earlier versions of evdev, so you'll have to make you run at least version 2.1.
0
Also, I find the middle button quite practical for scrolling. This can be configured via the xorg mouse input driver. Unfortunately, this is no longer possible with recent Linux distros (typically Fedora starting from version 9 or also Ubuntu from 8.10), the evdev driver is taking precedence, even though another driver is explicitly configured in xorg.conf (explanations from Red Hat developers can be found in this bug opened against Fedora 9). The correct solution is to disable this auto-detection by turning the "AutoAddDevices" server flag to "false".
Here are the relevant sections in my /etc/X11/xorg.conf:
Section "ServerFlags"
Option "AutoAddDevices" "false"
EndSection
Section "InputDevice"
Identifier "Trackpoint"
Driver "mouse"
Option "CorePointer"
Option "Device" "/dev/input/mice"
Option "Protocol" "ExplorerPS/2"
Option "Emulate3Buttons" "off"
Option "EmulateWheel" "on"
Option "EmulateWheelTimeOut" "200"
Option "EmulateWheelButton" "2"
Option "YAxisMapping" "4 5"
# Option "XAxisMapping" "6 7"
Option "ZAxisMapping" "4 5"
EndSection
Please note from the above that the middle button is only enabled for vertical scrolling. I'm barely using horizontal scrolling and it gets interpreted in Firefox as backwards/forwards which can get quickly annoying : ) Hence its being commented.
Posted on 4/26/2009 03:22:00 pm by Nicolas and filed under
fedora,
how-to,
linux,
open source,
trackpoint,
ubuntu,
X300
I've been asked recently my prefered settings for the pointing devices on Thinkpads... I'm addicted to the Trackpoint (the little red strawberry encrusted between the G, H and B keys) and the Trackpad (the flat sensitive surface also referred to as touchpad) generally disrupts me as I tend to accidentally touch it with the palm of my hand, so I generally disable it from the BIOS.Also, I find the middle button quite practical for scrolling. This can be configured via the xorg mouse input driver. Unfortunately, this is no longer possible with recent Linux distros (typically Fedora starting from version 9 or also Ubuntu from 8.10), the evdev driver is taking precedence, even though another driver is explicitly configured in xorg.conf (explanations from Red Hat developers can be found in this bug opened against Fedora 9). The correct solution is to disable this auto-detection by turning the "AutoAddDevices" server flag to "false".
Here are the relevant sections in my /etc/X11/xorg.conf:
Section "ServerFlags"
Option "AutoAddDevices" "false"
EndSection
Section "InputDevice"
Identifier "Trackpoint"
Driver "mouse"
Option "CorePointer"
Option "Device" "/dev/input/mice"
Option "Protocol" "ExplorerPS/2"
Option "Emulate3Buttons" "off"
Option "EmulateWheel" "on"
Option "EmulateWheelTimeOut" "200"
Option "EmulateWheelButton" "2"
Option "YAxisMapping" "4 5"
# Option "XAxisMapping" "6 7"
Option "ZAxisMapping" "4 5"
EndSection
Please note from the above that the middle button is only enabled for vertical scrolling. I'm barely using horizontal scrolling and it gets interpreted in Firefox as backwards/forwards which can get quickly annoying : ) Hence its being commented.
2
Quick update on the last post: the Thinkpad special keys are not all working. Basically, the ones that do work are the ones the are *directly* connected to the hardware: the Thinklight key, the volume keys, etc... The Fn+Fxx keys that are emulated via the X server have no effect, for instance the ones related to the screen brightness or the Fn+F2 to lock the session.
Taking the example of the brightness control keys, they appear configured in the X server mapping:
[nicolas@munin ~]$ xmodmap -pk|grep XF86MonBrightness
232 0x1008ff03 (XF86MonBrightnessDown) (...)
233 0x1008ff02 (XF86MonBrightnessUp) (...)
Experimenting with xev, it appears that the signals sent via the keys are indeed captured, i.e. the X server is aware that the special keys have been pressed and that the laptop should adjust the screen brightness accordingly... but still, nothing happens.
At the end of the day, the problem appears related to the way KDE interfaces with HAL (modern distros like Fedora 10 rely on it to configure the kernel input devices. Xorg in turn gets these key events through the evdev driver and will no longer try to take control of the input devices away from the kernel - NDLR).
Googling around, several bugs exists on various conbinations of KDE/kernel... but the good news is that the issue does not occur with GNOME. I've tested it with a Live Fedora distro, just to be sure, then opted to un-install KDE / install GNOME.
Taking the example of the brightness control keys, they appear configured in the X server mapping:
[nicolas@munin ~]$ xmodmap -pk|grep XF86MonBrightness
232 0x1008ff03 (XF86MonBrightnessDown) (...)
233 0x1008ff02 (XF86MonBrightnessUp) (...)
Experimenting with xev, it appears that the signals sent via the keys are indeed captured, i.e. the X server is aware that the special keys have been pressed and that the laptop should adjust the screen brightness accordingly... but still, nothing happens.
At the end of the day, the problem appears related to the way KDE interfaces with HAL (modern distros like Fedora 10 rely on it to configure the kernel input devices. Xorg in turn gets these key events through the evdev driver and will no longer try to take control of the input devices away from the kernel - NDLR).
Googling around, several bugs exists on various conbinations of KDE/kernel... but the good news is that the issue does not occur with GNOME. I've tested it with a Live Fedora distro, just to be sure, then opted to un-install KDE / install GNOME.
0
I've been the lucky owner of a Thinkpad x300 for a couple of weeks now... Brilliant ultra-portable laptop!! Just trying to summarize some of the installation/configuration steps I went through to get the machine working with my favourite softwares.
Almost everything worked out-of-the-box:
Hard disk password protection
Fingerprint reader
Wifi
Bluetooth
Webcam
Trackpoint/Touchpad
USB & USB mouse
Integrated keyboard light
DVD burner
Suspend/Hibernate
Then came configuration time...
1. Install Firefox
Then added my usual plugins: Adblock Plus, Foxmarks, LastPass
2. Configure SUDO so that my user is granted "superuser" authorizations and does not have to type in the root password each time
This was done via:
[nicolas@hector ~]$ su
Password:
[root@hector nicolas]# echo 'nicolas ALL=(ALL) NOPASSWD:ALL' >> /etc/sudoers
3. Setup YUM
For applications that are against Fedora licensing guidelines (typically MP3 and DVD players that will rely on proprietary formats), a 3rd party repository will have to be configured. For Fedora 10 this will be RPMFusion.
To set up the RPMFusion repositories:
[nicolas@hector ~]$ sudo rpm -ivh http://download1.rpmfusion.org/free/fedora/rpmfusion-free-release-stable.noarch.rpm
[nicolas@hector ~]$ sudo rpm -ivh http://download1.rpmfusion.org/nonfree/fedora/rpmfusion-nonfree-release-stable.noarch.rpm
[nicolas@hector ~]$ sudo rpm --import /etc/pki/rpm-gpg/RPM-GPG-KEY-rpmfusion-*
4. Media players
For the installation of MPLAYER through yum (RPMFusion enabled!):
[nicolas@hector TEMP]$ sudo yum install mplayer mplayer-gui gecko-mediaplayer mencoder
For VLC:
[nicolas@hector TEMP]$ sudo yum install vlc
5. Fonts
The "official" source for the Microsoft's TrueType fonts for Linuxes can be found here. Apparently, there's been a request for RPMFusion to include this package. But for the moment, you have to build your own RPM package using the msttcorefonts SPEC file provided by the above web site.
[nicolas@hector TEMP]$ sudo rpmbuild -bb msttcorefonts-2.0-1.spec
[nicolas@hector TEMP]$ sudo rpm -ivh $HOME/rpmbuild/RPMS/noarch/msttcorefonts-2.0-1.noarch.rpm
That said, Fedora encourages the use of the Liberation Fonts. They should get installed by default, but in case they're not, yum can install them:
[nicolas@hector TEMP]$ sudo yum install liberation-fonts
6. Adobe Flash
There's an option here. In short, the traditionnal way is to install the plugin nspluginwrapper as explained in the Fedora Wiki. That said, Adobe also offer an alpha version of a 64-bit plugin. Since it has been released a couple of months ago without any major issues being reported so far, I've opted for the latter. Full details can be found on the Adobe Labs web site.
Both installation methods gave good results on my machine. I've decided to stick with the alpha 64-bit package and installed the extracted libflashplayer.so to the system-wide /usr/lib64/mozilla/plugins/ rather than my user's ~/.mozilla/plugins/:
[nicolas@hector Download]$ ll libfl*
-rw-rw-r-- 1 nicolas nicolas 3729613 2009-03-27 08:28 libflashplayer-10.0.22.87.linux-x86_64.so.tar.gz
-rwxr-xr-x 1 nicolas nicolas 9543400 2009-02-03 04:03 libflashplayer.so
[nicolas@hector Download]$ sudo cp ./libflashplayer.so /usr/lib64/mozilla/plugins/libflashplayer.so
[nicolas@hector Download]$ ll /usr/lib64/mozilla/plugins/libfl*
-rwxr-xr-x 1 root root 9543400 2009-03-27 08:39 /usr/lib64/mozilla/plugins/libflashplayer.so
NB: T&C's from Adobe read as follows:
Important: Installing the Flash Player prerelease means you have accepted the terms of the Adobe Software License Agreement. This is prerelease software, not a final release.
Here's how the alpha 64-bit plugin displayed in Firefox:
File name: libflashplayer.so
Shockwave Flash 10.0 r22
7. Adobe Acrobat
To view PDF files, Fedora includes evince, however you may prefer to install the Adobe plugin.
This can be done via YUM after setting up the Adobe repository:
[nicolas@hector Download]$ sudo rpm -ivh
http://linuxdownload.adobe.com/adobe-release/adobe-release-i386-1.0-1.noarch.rpm
[nicolas@hector Download]$ sudo rpm --import /etc/pki/rpm-gpg/RPM-GPG-KEY-adobe-linux
[nicolas@hector Download]$ sudo yum install AdobeReader_enu
NB: Above steps are valid for the English version (the enu suffix). To list the different languages supported in Adobe's YUM repository, run the following command:
[nicolas@hector Download]$ yum list AdobeReader*
Other languages can be installed as above, just change the suffix of the AdobeReader package accordingly.
8. Sun Java
Once again, Fedora comes with a default OpenJDK, but you can download the Sun Java.
To do so, get the Java package from:
http://java.sun.com/javase/downloads/index.jsp
Select Java SE Runtime Environment (JRE) 6 Update 13 (or the full JDK). Then pick the "Linux x64" version. After that, select your language and view/accept the license agreement. On the next page, select the RPM option:
Java SE Runtime Environment 6u13
jre-6u13-linux-x64-rpm.bin 18.20 MB (64-bit users)
To install:
[nicolas@hector Download]$ sudo sh jre-6u13-linux-x64-rpm.bin
Finally, to setup the Sun JRE:
[nicolas@hector Download]$ sudo /usr/sbin/alternatives --install /usr/bin/java java /usr/java/default/bin/java 20000
The Mozilla browser plugin for 64-bit users:
[nicolas@hector Download]$ sudo /usr/sbin/alternatives --install /usr/lib64/mozilla/plugins/libjavaplugin.so libjavaplugin.so.x86_64 /usr/java/jre1.6.0_13/lib/amd64/libnpjp2.so 20000
NB: When updating the JRE package, simply download the newest RPM package and install as above. There will be no need to reset alternatives, as those settings should remain intact.
9. Virtual memory (VM) filesystems
There many good reasons to use tmpfs, Daniel Robbins summarized them brilliantly (and much better than I would...) on developerworks.
Additionally, for my personal use, I like the possibility to:
-clean up the content of tempfs filesystems at each reboot
-store sensible data (typically encryption keys) on such a transient media
-preserve my SSD life expectancy
By default with Fedora 10, /dev/shm is already a tmpfs. So I just add the following 2 lines to my /etc/fstab to make /tmp and /var/tmp two other ramdisk-like filesystems:
tmpfs /tmp tmpfs defaults,noatime,nodev,nosuid,mode=1777,size=1024M 0 0
tmpfs /var/tmp tmpfs defaults,noatime,mode=1777,size=512M 0 0
On my other laptop (with a traditional HD), the use of ramdisks FS increased the global performances of the machine. This is not guaranteed on an x300 with an SSD, but would have to be checked/confirmed.
Almost everything worked out-of-the-box:
Hard disk password protection
Fingerprint reader
Wifi
Bluetooth
Webcam
Trackpoint/Touchpad
USB & USB mouse
Integrated keyboard light
DVD burner
Suspend/Hibernate
Then came configuration time...
1. Install Firefox
Then added my usual plugins: Adblock Plus, Foxmarks, LastPass
2. Configure SUDO so that my user is granted "superuser" authorizations and does not have to type in the root password each time
This was done via:
[nicolas@hector ~]$ su
Password:
[root@hector nicolas]# echo 'nicolas ALL=(ALL) NOPASSWD:ALL' >> /etc/sudoers
3. Setup YUM
For applications that are against Fedora licensing guidelines (typically MP3 and DVD players that will rely on proprietary formats), a 3rd party repository will have to be configured. For Fedora 10 this will be RPMFusion.
To set up the RPMFusion repositories:
[nicolas@hector ~]$ sudo rpm -ivh http://download1.rpmfusion.org/free/fedora/rpmfusion-free-release-stable.noarch.rpm
[nicolas@hector ~]$ sudo rpm -ivh http://download1.rpmfusion.org/nonfree/fedora/rpmfusion-nonfree-release-stable.noarch.rpm
[nicolas@hector ~]$ sudo rpm --import /etc/pki/rpm-gpg/RPM-GPG-KEY-rpmfusion-*
4. Media players
For the installation of MPLAYER through yum (RPMFusion enabled!):
[nicolas@hector TEMP]$ sudo yum install mplayer mplayer-gui gecko-mediaplayer mencoder
For VLC:
[nicolas@hector TEMP]$ sudo yum install vlc
5. Fonts
The "official" source for the Microsoft's TrueType fonts for Linuxes can be found here. Apparently, there's been a request for RPMFusion to include this package. But for the moment, you have to build your own RPM package using the msttcorefonts SPEC file provided by the above web site.
[nicolas@hector TEMP]$ sudo rpmbuild -bb msttcorefonts-2.0-1.spec
[nicolas@hector TEMP]$ sudo rpm -ivh $HOME/rpmbuild/RPMS/noarch/msttcorefonts-2.0-1.noarch.rpm
That said, Fedora encourages the use of the Liberation Fonts. They should get installed by default, but in case they're not, yum can install them:
[nicolas@hector TEMP]$ sudo yum install liberation-fonts
6. Adobe Flash
There's an option here. In short, the traditionnal way is to install the plugin nspluginwrapper as explained in the Fedora Wiki. That said, Adobe also offer an alpha version of a 64-bit plugin. Since it has been released a couple of months ago without any major issues being reported so far, I've opted for the latter. Full details can be found on the Adobe Labs web site.
Both installation methods gave good results on my machine. I've decided to stick with the alpha 64-bit package and installed the extracted libflashplayer.so to the system-wide /usr/lib64/mozilla/plugins/ rather than my user's ~/.mozilla/plugins/:
[nicolas@hector Download]$ ll libfl*
-rw-rw-r-- 1 nicolas nicolas 3729613 2009-03-27 08:28 libflashplayer-10.0.22.87.linux-x86_64.so.tar.gz
-rwxr-xr-x 1 nicolas nicolas 9543400 2009-02-03 04:03 libflashplayer.so
[nicolas@hector Download]$ sudo cp ./libflashplayer.so /usr/lib64/mozilla/plugins/libflashplayer.so
[nicolas@hector Download]$ ll /usr/lib64/mozilla/plugins/libfl*
-rwxr-xr-x 1 root root 9543400 2009-03-27 08:39 /usr/lib64/mozilla/plugins/libflashplayer.so
NB: T&C's from Adobe read as follows:
Important: Installing the Flash Player prerelease means you have accepted the terms of the Adobe Software License Agreement. This is prerelease software, not a final release.
Here's how the alpha 64-bit plugin displayed in Firefox:
File name: libflashplayer.so
Shockwave Flash 10.0 r22
7. Adobe Acrobat
To view PDF files, Fedora includes evince, however you may prefer to install the Adobe plugin.
This can be done via YUM after setting up the Adobe repository:
[nicolas@hector Download]$ sudo rpm -ivh
http://linuxdownload.adobe.com/adobe-release/adobe-release-i386-1.0-1.noarch.rpm
[nicolas@hector Download]$ sudo rpm --import /etc/pki/rpm-gpg/RPM-GPG-KEY-adobe-linux
[nicolas@hector Download]$ sudo yum install AdobeReader_enu
NB: Above steps are valid for the English version (the enu suffix). To list the different languages supported in Adobe's YUM repository, run the following command:
[nicolas@hector Download]$ yum list AdobeReader*
Other languages can be installed as above, just change the suffix of the AdobeReader package accordingly.
8. Sun Java
Once again, Fedora comes with a default OpenJDK, but you can download the Sun Java.
To do so, get the Java package from:
http://java.sun.com/javase/downloads/index.jsp
Select Java SE Runtime Environment (JRE) 6 Update 13 (or the full JDK). Then pick the "Linux x64" version. After that, select your language and view/accept the license agreement. On the next page, select the RPM option:
Java SE Runtime Environment 6u13
jre-6u13-linux-x64-rpm.bin 18.20 MB (64-bit users)
To install:
[nicolas@hector Download]$ sudo sh jre-6u13-linux-x64-rpm.bin
Finally, to setup the Sun JRE:
[nicolas@hector Download]$ sudo /usr/sbin/alternatives --install /usr/bin/java java /usr/java/default/bin/java 20000
The Mozilla browser plugin for 64-bit users:
[nicolas@hector Download]$ sudo /usr/sbin/alternatives --install /usr/lib64/mozilla/plugins/libjavaplugin.so libjavaplugin.so.x86_64 /usr/java/jre1.6.0_13/lib/amd64/libnpjp2.so 20000
NB: When updating the JRE package, simply download the newest RPM package and install as above. There will be no need to reset alternatives, as those settings should remain intact.
9. Virtual memory (VM) filesystems
There many good reasons to use tmpfs, Daniel Robbins summarized them brilliantly (and much better than I would...) on developerworks.
Additionally, for my personal use, I like the possibility to:
-clean up the content of tempfs filesystems at each reboot
-store sensible data (typically encryption keys) on such a transient media
-preserve my SSD life expectancy
By default with Fedora 10, /dev/shm is already a tmpfs. So I just add the following 2 lines to my /etc/fstab to make /tmp and /var/tmp two other ramdisk-like filesystems:
tmpfs /tmp tmpfs defaults,noatime,nodev,nosuid,mode=1777,size=1024M 0 0
tmpfs /var/tmp tmpfs defaults,noatime,mode=1777,size=512M 0 0
On my other laptop (with a traditional HD), the use of ramdisks FS increased the global performances of the machine. This is not guaranteed on an x300 with an SSD, but would have to be checked/confirmed.
