Showing posts with label ubuntu. Show all posts
Showing posts with label ubuntu. Show all posts
3
Long time no speak... Glad to be back : )
Unfortunately, it's to share some of my findings with configuring Ubuntu on a Thinkpad X300, which means I had to spend some time figuring out the correct settings... But let's cut down to the chase: configuring the X300 internal mic to work with your favorite "sound capturing" program, in our case, let's say skype.
First, you'd need to have the "backports-alsa-karmic" for your version of Ubuntu, whichever it is: linux-backports-alsa-karmic-generic or linux-backports-alsa-karmic-generic-pae
Also make sure you have the package "gnome-alsamixer" installed, as this will play a crucial part in the config...
Then, it's a 2-part operation:
1. Manually loading ALSA
This means editing the /etc/pulse/default.pa to add a line similar to:
load-module module-alsa-source device=hw:0,0
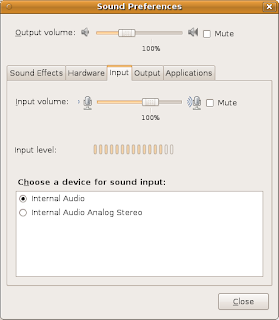
Upon restart, you will see notice a new entry in the "Input" tab of the "Sound preferences", named "Internal Audio", as opposed to the "Internal Audio Analog Stereo" that existed before. See the screenshot below, where you'll notice that the input level gauge recognizes I'm currently speaking to my laptop)))
2. Configure ALSA
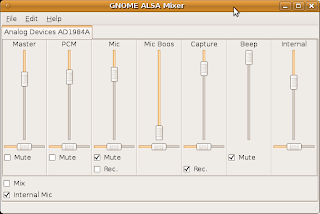
This is done via the GUI you start with Applications > Sound & Video > GNOME ALSA Mixer. The important part is to have the Rec checkbox ticked under "Capture". Once again, screenshot below...
After that, your application should be able to capture sound from the internal mic...
Unfortunately, it's to share some of my findings with configuring Ubuntu on a Thinkpad X300, which means I had to spend some time figuring out the correct settings... But let's cut down to the chase: configuring the X300 internal mic to work with your favorite "sound capturing" program, in our case, let's say skype.
First, you'd need to have the "backports-alsa-karmic" for your version of Ubuntu, whichever it is: linux-backports-alsa-karmic-generic or linux-backports-alsa-karmic-generic-pae
Also make sure you have the package "gnome-alsamixer" installed, as this will play a crucial part in the config...
Then, it's a 2-part operation:
1. Manually loading ALSA
This means editing the /etc/pulse/default.pa to add a line similar to:
load-module module-alsa-source device=hw:0,0
Upon restart, you will see notice a new entry in the "Input" tab of the "Sound preferences", named "Internal Audio", as opposed to the "Internal Audio Analog Stereo" that existed before. See the screenshot below, where you'll notice that the input level gauge recognizes I'm currently speaking to my laptop)))

2. Configure ALSA
This is done via the GUI you start with Applications > Sound & Video > GNOME ALSA Mixer. The important part is to have the Rec checkbox ticked under "Capture". Once again, screenshot below...

After that, your application should be able to capture sound from the internal mic...
1
For a while now, I've been searching documentation about Solid State Drives (SSD). They are still quite expensive when compared to traditional SATA drives - 40 times more expensive in fact :), but they offer good performances and as their prices will keep falling down, they will make a better alternative. Among other advantages, they are shock-resistant, consume less resources than traditional HD and have very fast access times.
My X300 is currently fitted with a 64GB Samsung SSD that works fine with either Fedora or Ubuntu. That said, the performance and life expectency of an SSD drive can be significantly improved by a few tweaks.
1. Mount volumes using the noatime option
By default on Linux, the last accessed time of files will be logged. All these additional write operations can reduce the life of the disk. The noatime mount option will turn this off. Most Linux distros use the relatime option by default. For your SSD partitions (presumably formatted as ext3), replace relatime with noatime in /etc/fstab.
PS: you need a reboot for these changes to take effect.
2. Change the I/O scheduler
The default I/O scheduler in Linux is cfq, which stands for "completely fair queuing". It works quite well with standard HD but since SSDs are a different sort of beast, noop or deadline are probably more suited to them.
Personally, I've opted for noop. Simply added “elevator=noop” to the kernel parameters in my boot loader’s config file - typically /boot/grub/menu.lst. Here is the Fedora section on my laptop:
Once again, this type of change need a restart to be fully effective.
3. Prefer ramdisk for temporary filesystems
This is something I've been using for a while, even with standard HD, for machines where the amount of available RAM is important. For standard HD, the reasoning was that reading the RAM was faster than reading the disk. With SSD, this performance argument can be discussed, but still, you will increase your disk's life expectancy by moving temporary filesystems that are frequently read to the RAM. Another advantage is that these filesystems are removed then re-mounted at every reboot, meaning that you are less likely to have to clean them up manually.
Again, the changes are to be made in /etc/fstab. Here is a sample from my Ubuntu fstab:
Limiting the size of these tmpfs directly in /etc/fstab is likely a bit of an overkill, but these temporary filesystems (especially /tmp) can be filled up pretty quickly (by an application core dump for instance) and you surely don't want to see all your RAM eaten up in such case...
For a while now, I've been searching documentation about Solid State Drives (SSD). They are still quite expensive when compared to traditional SATA drives - 40 times more expensive in fact :), but they offer good performances and as their prices will keep falling down, they will make a better alternative. Among other advantages, they are shock-resistant, consume less resources than traditional HD and have very fast access times.
My X300 is currently fitted with a 64GB Samsung SSD that works fine with either Fedora or Ubuntu. That said, the performance and life expectency of an SSD drive can be significantly improved by a few tweaks.
1. Mount volumes using the noatime option
By default on Linux, the last accessed time of files will be logged. All these additional write operations can reduce the life of the disk. The noatime mount option will turn this off. Most Linux distros use the relatime option by default. For your SSD partitions (presumably formatted as ext3), replace relatime with noatime in /etc/fstab.
PS: you need a reboot for these changes to take effect.
2. Change the I/O scheduler
The default I/O scheduler in Linux is cfq, which stands for "completely fair queuing". It works quite well with standard HD but since SSDs are a different sort of beast, noop or deadline are probably more suited to them.
Personally, I've opted for noop. Simply added “elevator=noop” to the kernel parameters in my boot loader’s config file - typically /boot/grub/menu.lst. Here is the Fedora section on my laptop:
title Fedora Core 10
root (hd0,0)
kernel /vmlinuz-2.6.27.21-170.2.56.fc10.x86_64 ro rhgb quiet elevator=noop
initrd /initrd-2.6.27.21-170.2.56.fc10.x86_64.img
quiet
root (hd0,0)
kernel /vmlinuz-2.6.27.21-170.2.56.fc10.x86_64 ro rhgb quiet elevator=noop
initrd /initrd-2.6.27.21-170.2.56.fc10.x86_64.img
quiet
Once again, this type of change need a restart to be fully effective.
3. Prefer ramdisk for temporary filesystems
This is something I've been using for a while, even with standard HD, for machines where the amount of available RAM is important. For standard HD, the reasoning was that reading the RAM was faster than reading the disk. With SSD, this performance argument can be discussed, but still, you will increase your disk's life expectancy by moving temporary filesystems that are frequently read to the RAM. Another advantage is that these filesystems are removed then re-mounted at every reboot, meaning that you are less likely to have to clean them up manually.
Again, the changes are to be made in /etc/fstab. Here is a sample from my Ubuntu fstab:
$ grep tmpfs /etc/fstab
tmpfs /tmp tmpfs defaults,noatime,mode=1777,size=1024M 0 0
tmpfs /var/tmp tmpfs defaults,noatime,mode=1777,size=512M 0 0
tmpfs /tmp tmpfs defaults,noatime,mode=1777,size=1024M 0 0
tmpfs /var/tmp tmpfs defaults,noatime,mode=1777,size=512M 0 0
Limiting the size of these tmpfs directly in /etc/fstab is likely a bit of an overkill, but these temporary filesystems (especially /tmp) can be filled up pretty quickly (by an application core dump for instance) and you surely don't want to see all your RAM eaten up in such case...
2
I have to admit it took me several tries to have the internal microphone working on my Thinkpad X300. In case you're looking for some working settings gnome-volume-control, here are the one that work on my Jaunty config:


NB: the Skype options that do work with the above settings are:


NB: the Skype options that do work with the above settings are:

1
The easiest tool to profile and analyse a machine's boot sequence is probably bootchart. It will run on all Unix distros and will generate easy-to-read graphs.
Basics on using bootchart on Ubuntu
The bootchart package is available in the Ubuntu repositories, so it can be installed either through apt-get or Synaptic. After you install it, all you have to do to generate your first bootchart is restart (dead easy, eh?!). The graph is stored in /var/log/bootchart as a PNG file. Each bootchart is listed with the hostname, date and a number sorting charts generated on the same day. An example bootchart will look like this:
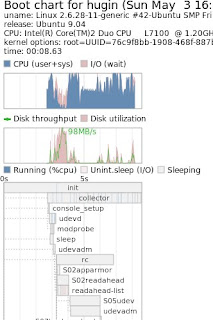
This graphically shows you what your computer is doing in terms of CPU, IO, and processes during the boot procedure. The chart itself contains 4 sections:
-description of the system
-CPU graph
-I/O graph
-a Gantt-like chart showing the details and sequence of the running processes
By default, bootchart stops recording when it has detected gdm has started, so be aware that the resulting charts are unlikely to include the extra time gdm takes to start up and show you a usable desktop. But usually by that point the init is done and the remaining optimizations need to be done in the window manager (Gnome, KDE, XFCE, etc...) rather than in the system init scripts. The most immediately useful purpose of bootchart is to objectively discover the boot time, and where the bottlenecks are. For example, the boot chart below, captured on the same machine with the same OS and parameters shows a total boot time of 14 seconds, which isn't bad, but still almost double than above!!
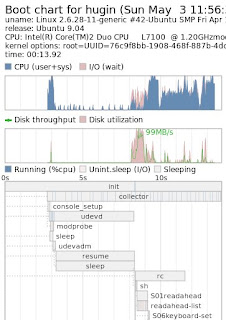
Ideally, you'd want your init to max out the CPU at 100% as much as possible. If the CPU is not pegged at 100% and there is a high I/O wait, that usually means your CPU is idling while it is waiting for the disk to return data. But if your CPU is idle and the I/O are limited, you'd want to investigate... Basically, in the case above, you'll quickly notice a 5 seconds "dead zone", with 2 suspicious processes named "resume" and "sleep". In fact, this 5 seconds delay makes up for most of the difference between the two boot sequences.
So where can they come from and what should be done to optimize the boot time? Well, first you'll notice the 5 seconds sleep occurs before the rc scripts, so no need to fiddle with your startup scripts. Then you'll notice they come in sequence after the console_setup, which points you to the initramfs scripts. Once that is said, the solution is obvious: the "sleep 5" comes from the initramfs script trying to mount the RAM. Having a look at the logs will confirm this and give some indications as to what is failing. This behavior could typically be caused by the fact that you have somehow modified your swap partition (new kernel setup? swap partition resize?) and thus initramfs-tools cannot find the partition through the old UUID...
PS: Once you are done playing with bootchart and with your optimizations, you'll probably want to un-install the package so you don't keep writing PNG files on every boot...
Posted on 5/03/2009 04:51:00 pm by Nicolas and filed under
bootchart,
how-to,
linux,
open source,
tool,
ubuntu
Boot times have become quite a hot topic, especially since the release of Ubuntu 9.04, which emphasised on shorter boot times - "some as short as 25 seconds" as per the official announcement.The easiest tool to profile and analyse a machine's boot sequence is probably bootchart. It will run on all Unix distros and will generate easy-to-read graphs.
Basics on using bootchart on Ubuntu
The bootchart package is available in the Ubuntu repositories, so it can be installed either through apt-get or Synaptic. After you install it, all you have to do to generate your first bootchart is restart (dead easy, eh?!). The graph is stored in /var/log/bootchart as a PNG file. Each bootchart is listed with the hostname, date and a number sorting charts generated on the same day. An example bootchart will look like this:

This graphically shows you what your computer is doing in terms of CPU, IO, and processes during the boot procedure. The chart itself contains 4 sections:
-description of the system
-CPU graph
-I/O graph
-a Gantt-like chart showing the details and sequence of the running processes
By default, bootchart stops recording when it has detected gdm has started, so be aware that the resulting charts are unlikely to include the extra time gdm takes to start up and show you a usable desktop. But usually by that point the init is done and the remaining optimizations need to be done in the window manager (Gnome, KDE, XFCE, etc...) rather than in the system init scripts. The most immediately useful purpose of bootchart is to objectively discover the boot time, and where the bottlenecks are. For example, the boot chart below, captured on the same machine with the same OS and parameters shows a total boot time of 14 seconds, which isn't bad, but still almost double than above!!

Ideally, you'd want your init to max out the CPU at 100% as much as possible. If the CPU is not pegged at 100% and there is a high I/O wait, that usually means your CPU is idling while it is waiting for the disk to return data. But if your CPU is idle and the I/O are limited, you'd want to investigate... Basically, in the case above, you'll quickly notice a 5 seconds "dead zone", with 2 suspicious processes named "resume" and "sleep". In fact, this 5 seconds delay makes up for most of the difference between the two boot sequences.
So where can they come from and what should be done to optimize the boot time? Well, first you'll notice the 5 seconds sleep occurs before the rc scripts, so no need to fiddle with your startup scripts. Then you'll notice they come in sequence after the console_setup, which points you to the initramfs scripts. Once that is said, the solution is obvious: the "sleep 5" comes from the initramfs script trying to mount the RAM. Having a look at the logs will confirm this and give some indications as to what is failing. This behavior could typically be caused by the fact that you have somehow modified your swap partition (new kernel setup? swap partition resize?) and thus initramfs-tools cannot find the partition through the old UUID...
PS: Once you are done playing with bootchart and with your optimizations, you'll probably want to un-install the package so you don't keep writing PNG files on every boot...
0
So here is an example of how this can be done:
1. create a file /etc/hal/fdi/policy/mouse-wheel.fdi with a content like: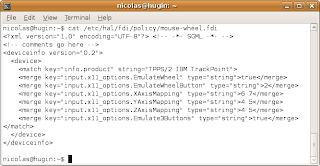 2. restart HAL, check the config is taken into account then restart your X server
Posted on 4/27/2009 07:14:00 pm by Nicolas and filed under
how-to,
linux,
open source,
trackpoint,
ubuntu,
X300
After yesterday's update on evdev on Fedora 10, I starting wondering if this could be portable on Ubuntu to configure the old EmulateWheel functionalities. evdev was indeed ported to Ubuntu, so, provided the version was compatible (>2.1) then there was no reason why this would not be valid... And indeed it is! It also offers the huge advantage ofnot having to play with the xorg.conf file, which is always a risk given it impacts the behaviour of the whole X server.So here is an example of how this can be done:
1. create a file /etc/hal/fdi/policy/mouse-wheel.fdi with a content like:
 2. restart HAL, check the config is taken into account then restart your X server
0
Also, I find the middle button quite practical for scrolling. This can be configured via the xorg mouse input driver. Unfortunately, this is no longer possible with recent Linux distros (typically Fedora starting from version 9 or also Ubuntu from 8.10), the evdev driver is taking precedence, even though another driver is explicitly configured in xorg.conf (explanations from Red Hat developers can be found in this bug opened against Fedora 9). The correct solution is to disable this auto-detection by turning the "AutoAddDevices" server flag to "false".
Here are the relevant sections in my /etc/X11/xorg.conf:
Section "ServerFlags"
Option "AutoAddDevices" "false"
EndSection
Section "InputDevice"
Identifier "Trackpoint"
Driver "mouse"
Option "CorePointer"
Option "Device" "/dev/input/mice"
Option "Protocol" "ExplorerPS/2"
Option "Emulate3Buttons" "off"
Option "EmulateWheel" "on"
Option "EmulateWheelTimeOut" "200"
Option "EmulateWheelButton" "2"
Option "YAxisMapping" "4 5"
# Option "XAxisMapping" "6 7"
Option "ZAxisMapping" "4 5"
EndSection
Please note from the above that the middle button is only enabled for vertical scrolling. I'm barely using horizontal scrolling and it gets interpreted in Firefox as backwards/forwards which can get quickly annoying : ) Hence its being commented.
Posted on 4/26/2009 03:22:00 pm by Nicolas and filed under
fedora,
how-to,
linux,
open source,
trackpoint,
ubuntu,
X300
I've been asked recently my prefered settings for the pointing devices on Thinkpads... I'm addicted to the Trackpoint (the little red strawberry encrusted between the G, H and B keys) and the Trackpad (the flat sensitive surface also referred to as touchpad) generally disrupts me as I tend to accidentally touch it with the palm of my hand, so I generally disable it from the BIOS.Also, I find the middle button quite practical for scrolling. This can be configured via the xorg mouse input driver. Unfortunately, this is no longer possible with recent Linux distros (typically Fedora starting from version 9 or also Ubuntu from 8.10), the evdev driver is taking precedence, even though another driver is explicitly configured in xorg.conf (explanations from Red Hat developers can be found in this bug opened against Fedora 9). The correct solution is to disable this auto-detection by turning the "AutoAddDevices" server flag to "false".
Here are the relevant sections in my /etc/X11/xorg.conf:
Section "ServerFlags"
Option "AutoAddDevices" "false"
EndSection
Section "InputDevice"
Identifier "Trackpoint"
Driver "mouse"
Option "CorePointer"
Option "Device" "/dev/input/mice"
Option "Protocol" "ExplorerPS/2"
Option "Emulate3Buttons" "off"
Option "EmulateWheel" "on"
Option "EmulateWheelTimeOut" "200"
Option "EmulateWheelButton" "2"
Option "YAxisMapping" "4 5"
# Option "XAxisMapping" "6 7"
Option "ZAxisMapping" "4 5"
EndSection
Please note from the above that the middle button is only enabled for vertical scrolling. I'm barely using horizontal scrolling and it gets interpreted in Firefox as backwards/forwards which can get quickly annoying : ) Hence its being commented.
0
The relevant extract from the Release Notes reads:
Just to make it completely clear: the dontzap package is NOT installed by default, which means you will have to install it from the depots before enabling it!
Posted on 4/26/2009 09:13:00 am by Nicolas and filed under
gnome,
how-to,
linux,
open source,
ubuntu
Yes, apparently, they have done it, despite all the Linux fanatics shouting this would be a regression just to please newbies that are not familiar with it...The relevant extract from the Release Notes reads:
Ctrl-Alt-Backspace is now disabled, to reduce issues experienced by users who accidentally trigger the key combo. Users who do want this function can enable it in their xorg.conf, or via the command dontzap –disable.Well, at least there's a positive since you can install an additional package that will re-enable this powerful key combination to restart the X server when needed.
Just to make it completely clear: the dontzap package is NOT installed by default, which means you will have to install it from the depots before enabling it!
0
Apparently, some users have reported poor performance from the latest Ubuntu distribution with Intel graphics cards. This was not the case on my x300 equiped with an Intel Mobile GM965/GL960 Integrated Graphics Controller: with the distro's default xserver-xorg-video-intel glxgears had results around 750 FPS, (re)installing the oldest version 2.4 caused the glxgears scores to fall to approximately 230 FPS per sample interval...
Also the tweak around EXA/UXA had no effect on my config.
For reference:
Troubleshooting Intel graphics performance issues
Reverting the Jaunty Xorg intel driver to 2.4
Glxgears is not a Benchmark
Also the tweak around EXA/UXA had no effect on my config.
For reference:
Troubleshooting Intel graphics performance issues
Reverting the Jaunty Xorg intel driver to 2.4
Glxgears is not a Benchmark
0
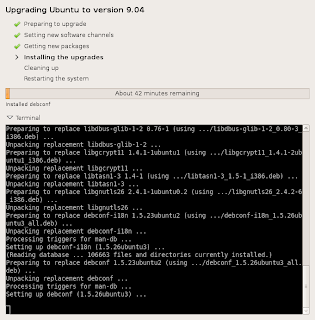
The new release of Unbuntu - 9.04, has been released thursday. Having used their version 8.10 for a while now, I could not resist to download the alternate ISO installer yesterday and proceed with the upgrade. Here are the different steps...
First, copy the installer to the directory of your choice, mount the ISO image and start the upgrade:

After that, it's all graphic...

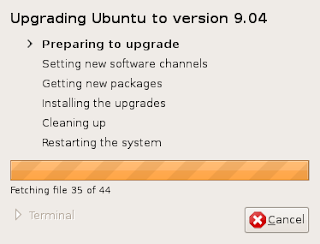
A little reminder that some of the 3rd party sources have been disabled during the upgrade:
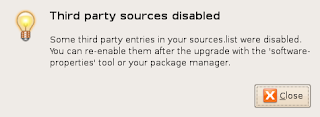
... before the upgrade resumes:
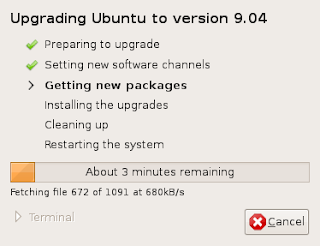
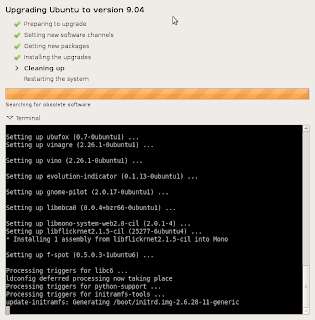
Almost finished as it will clean up the installation from obsolete packages:
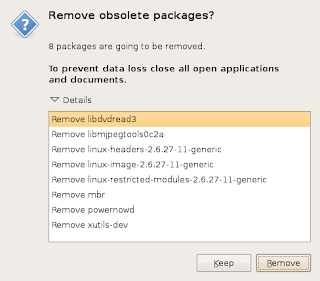
Confirm the packages you want to un-install:
And that's done!
Edit your boot menu manually if like me you're using a dual boot system, then reboot.
After the reboot, confirm the kernel/release you're running:
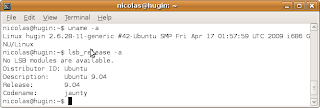
A simple upgrade with a happy ending...
First, copy the installer to the directory of your choice, mount the ISO image and start the upgrade:

After that, it's all graphic...

A little reminder that some of the 3rd party sources have been disabled during the upgrade:

... before the upgrade resumes:


Almost finished as it will clean up the installation from obsolete packages:

Confirm the packages you want to un-install:

And that's done!
Edit your boot menu manually if like me you're using a dual boot system, then reboot.
After the reboot, confirm the kernel/release you're running:

A simple upgrade with a happy ending...
0
Canonical, the editor of Ubuntu, seem ready to launch a version of their Linux OS for mobile platforms (called Netbook Remix). Mark Shuttleworth (Chief executive of Canonical Ltd, founder of the Ubuntu project) told the Guardian recently: "We're working with Intel, which produces chips custom-made for this sector".
It seems that Canonical has been working on this project for months and made it a priority. That said, the new version of Ubuntu is barely mentioned in this interview, but it's a tantalizing prospect: SUSE looks really nice on the HP Mininotes and I'm eager to see Ubuntu running on a mobile platform.
PS: nice view on the London Eye from your desk, Mark!
It seems that Canonical has been working on this project for months and made it a priority. That said, the new version of Ubuntu is barely mentioned in this interview, but it's a tantalizing prospect: SUSE looks really nice on the HP Mininotes and I'm eager to see Ubuntu running on a mobile platform.
PS: nice view on the London Eye from your desk, Mark!
