Showing posts with label how-to. Show all posts
Showing posts with label how-to. Show all posts
0
Coming from a sysadmin background, I appreciate having a constant view on the OS metrics like CPU and memory usage, disk space left, etc... There are plenty of tools available out there to do that, but none as simple and as flexible as conky. I like it so much that it actually runs in the background of all my Linuxes (desktops as well as servers). My main usage is sysadmin-oriented, but there are plenty of other functionalities available, like displaying the weather forecasts, or interfacing with Amarok or Rhythmbox to show the details of the song currently playing, etc... the possibilities are infinite.
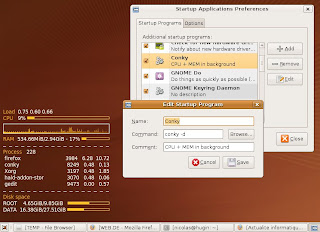
All you have have to do is create a ~/.conkry file in the user's home directory and have your your session manager start the conky deamon automatically. Below is a an exemple how of to do that for the Ubuntu Gnome desktop, with the resulting little panel on the bottom left of the destop:
Posted on 5/03/2009 07:51:00 pm by Nicolas and filed under
conky,
how-to,
linux,
monitoring,
open source,
tool
To keep on with the applications/tools I could not live without (see below for bootchart), here comes a quick post on conky.Coming from a sysadmin background, I appreciate having a constant view on the OS metrics like CPU and memory usage, disk space left, etc... There are plenty of tools available out there to do that, but none as simple and as flexible as conky. I like it so much that it actually runs in the background of all my Linuxes (desktops as well as servers). My main usage is sysadmin-oriented, but there are plenty of other functionalities available, like displaying the weather forecasts, or interfacing with Amarok or Rhythmbox to show the details of the song currently playing, etc... the possibilities are infinite.
All you have have to do is create a ~/.conkry file in the user's home directory and have your your session manager start the conky deamon automatically. Below is a an exemple how of to do that for the Ubuntu Gnome desktop, with the resulting little panel on the bottom left of the destop:

1
The easiest tool to profile and analyse a machine's boot sequence is probably bootchart. It will run on all Unix distros and will generate easy-to-read graphs.
Basics on using bootchart on Ubuntu
The bootchart package is available in the Ubuntu repositories, so it can be installed either through apt-get or Synaptic. After you install it, all you have to do to generate your first bootchart is restart (dead easy, eh?!). The graph is stored in /var/log/bootchart as a PNG file. Each bootchart is listed with the hostname, date and a number sorting charts generated on the same day. An example bootchart will look like this:
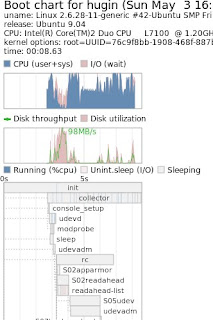
This graphically shows you what your computer is doing in terms of CPU, IO, and processes during the boot procedure. The chart itself contains 4 sections:
-description of the system
-CPU graph
-I/O graph
-a Gantt-like chart showing the details and sequence of the running processes
By default, bootchart stops recording when it has detected gdm has started, so be aware that the resulting charts are unlikely to include the extra time gdm takes to start up and show you a usable desktop. But usually by that point the init is done and the remaining optimizations need to be done in the window manager (Gnome, KDE, XFCE, etc...) rather than in the system init scripts. The most immediately useful purpose of bootchart is to objectively discover the boot time, and where the bottlenecks are. For example, the boot chart below, captured on the same machine with the same OS and parameters shows a total boot time of 14 seconds, which isn't bad, but still almost double than above!!
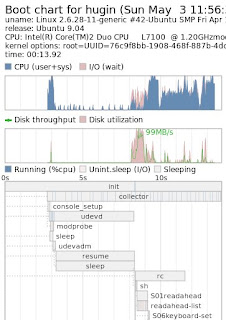
Ideally, you'd want your init to max out the CPU at 100% as much as possible. If the CPU is not pegged at 100% and there is a high I/O wait, that usually means your CPU is idling while it is waiting for the disk to return data. But if your CPU is idle and the I/O are limited, you'd want to investigate... Basically, in the case above, you'll quickly notice a 5 seconds "dead zone", with 2 suspicious processes named "resume" and "sleep". In fact, this 5 seconds delay makes up for most of the difference between the two boot sequences.
So where can they come from and what should be done to optimize the boot time? Well, first you'll notice the 5 seconds sleep occurs before the rc scripts, so no need to fiddle with your startup scripts. Then you'll notice they come in sequence after the console_setup, which points you to the initramfs scripts. Once that is said, the solution is obvious: the "sleep 5" comes from the initramfs script trying to mount the RAM. Having a look at the logs will confirm this and give some indications as to what is failing. This behavior could typically be caused by the fact that you have somehow modified your swap partition (new kernel setup? swap partition resize?) and thus initramfs-tools cannot find the partition through the old UUID...
PS: Once you are done playing with bootchart and with your optimizations, you'll probably want to un-install the package so you don't keep writing PNG files on every boot...
Posted on 5/03/2009 04:51:00 pm by Nicolas and filed under
bootchart,
how-to,
linux,
open source,
tool,
ubuntu
Boot times have become quite a hot topic, especially since the release of Ubuntu 9.04, which emphasised on shorter boot times - "some as short as 25 seconds" as per the official announcement.The easiest tool to profile and analyse a machine's boot sequence is probably bootchart. It will run on all Unix distros and will generate easy-to-read graphs.
Basics on using bootchart on Ubuntu
The bootchart package is available in the Ubuntu repositories, so it can be installed either through apt-get or Synaptic. After you install it, all you have to do to generate your first bootchart is restart (dead easy, eh?!). The graph is stored in /var/log/bootchart as a PNG file. Each bootchart is listed with the hostname, date and a number sorting charts generated on the same day. An example bootchart will look like this:

This graphically shows you what your computer is doing in terms of CPU, IO, and processes during the boot procedure. The chart itself contains 4 sections:
-description of the system
-CPU graph
-I/O graph
-a Gantt-like chart showing the details and sequence of the running processes
By default, bootchart stops recording when it has detected gdm has started, so be aware that the resulting charts are unlikely to include the extra time gdm takes to start up and show you a usable desktop. But usually by that point the init is done and the remaining optimizations need to be done in the window manager (Gnome, KDE, XFCE, etc...) rather than in the system init scripts. The most immediately useful purpose of bootchart is to objectively discover the boot time, and where the bottlenecks are. For example, the boot chart below, captured on the same machine with the same OS and parameters shows a total boot time of 14 seconds, which isn't bad, but still almost double than above!!

Ideally, you'd want your init to max out the CPU at 100% as much as possible. If the CPU is not pegged at 100% and there is a high I/O wait, that usually means your CPU is idling while it is waiting for the disk to return data. But if your CPU is idle and the I/O are limited, you'd want to investigate... Basically, in the case above, you'll quickly notice a 5 seconds "dead zone", with 2 suspicious processes named "resume" and "sleep". In fact, this 5 seconds delay makes up for most of the difference between the two boot sequences.
So where can they come from and what should be done to optimize the boot time? Well, first you'll notice the 5 seconds sleep occurs before the rc scripts, so no need to fiddle with your startup scripts. Then you'll notice they come in sequence after the console_setup, which points you to the initramfs scripts. Once that is said, the solution is obvious: the "sleep 5" comes from the initramfs script trying to mount the RAM. Having a look at the logs will confirm this and give some indications as to what is failing. This behavior could typically be caused by the fact that you have somehow modified your swap partition (new kernel setup? swap partition resize?) and thus initramfs-tools cannot find the partition through the old UUID...
PS: Once you are done playing with bootchart and with your optimizations, you'll probably want to un-install the package so you don't keep writing PNG files on every boot...
0
So here is an example of how this can be done:
1. create a file /etc/hal/fdi/policy/mouse-wheel.fdi with a content like: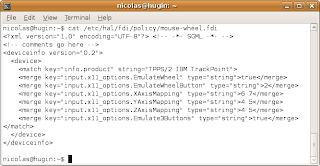 2. restart HAL, check the config is taken into account then restart your X server
Posted on 4/27/2009 07:14:00 pm by Nicolas and filed under
how-to,
linux,
open source,
trackpoint,
ubuntu,
X300
After yesterday's update on evdev on Fedora 10, I starting wondering if this could be portable on Ubuntu to configure the old EmulateWheel functionalities. evdev was indeed ported to Ubuntu, so, provided the version was compatible (>2.1) then there was no reason why this would not be valid... And indeed it is! It also offers the huge advantage ofnot having to play with the xorg.conf file, which is always a risk given it impacts the behaviour of the whole X server.So here is an example of how this can be done:
1. create a file /etc/hal/fdi/policy/mouse-wheel.fdi with a content like:
 2. restart HAL, check the config is taken into account then restart your X server
0
But it's probably worth another separate post...
It still evolves around the topic of configuring the "how wonderful!" middle button horizontal scrolling. I was not so sure how I had worked it out on Fedora 10, so I just rebooted to this OS and confirmed that the tweak with the "mouse" driver does not work on this distro. As said below, it *does* work with Fedora 9 though. What happens is that this button is "emulated" via HAL. No point looking for the xorg.conf file as there should not be any such file...
To configure the TrackPoint scroll, you have to:
1. Edit the config file /usr/share/hal/fdi/policy/10osvendor/10-x11-input.fdi
Basically, just add lines similar to the following in the relevant part of the file:
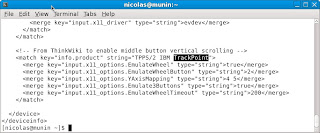 ... by relevant, I mean you'll have to make sure you're in the correct section of the file as markup languages are sensitive to that... If you don't see what this means, have a look at the markup language article on Wikipedia.
2. Then restart HAL and check the modifications appear among the
device options that you can check via the output of lshal. Typically:
[nicolas@munin ~]$ lshal | grep TrackPoint
info.product = 'TPPS/2 IBM TrackPoint' (string)
input.product = 'TPPS/2 IBM TrackPoint' (string)
3. Finally restart the X server and enjoy some nice and smooth vertical scrolling!
NDLR: once again, from the above extract you'll notice the FDI file does not enable horizontal scrolling... same reason as below: Firefox would understand it has a backward/forward instruction...
For reference, here is the original article on Thinkwiki.
I am also aware that it used to *not* work on earlier versions of evdev, so you'll have to make you run at least version 2.1.
Posted on 4/26/2009 05:34:00 pm by Nicolas and filed under
fedora,
how-to,
linux,
open source,
trackpoint,
X300
It's a sort of edit to my previous post - see just below for the original story ;)But it's probably worth another separate post...
It still evolves around the topic of configuring the "how wonderful!" middle button horizontal scrolling. I was not so sure how I had worked it out on Fedora 10, so I just rebooted to this OS and confirmed that the tweak with the "mouse" driver does not work on this distro. As said below, it *does* work with Fedora 9 though. What happens is that this button is "emulated" via HAL. No point looking for the xorg.conf file as there should not be any such file...
To configure the TrackPoint scroll, you have to:
1. Edit the config file /usr/share/hal/fdi/policy/10osvendor/10-x11-input.fdi
Basically, just add lines similar to the following in the relevant part of the file:
 ... by relevant, I mean you'll have to make sure you're in the correct section of the file as markup languages are sensitive to that... If you don't see what this means, have a look at the markup language article on Wikipedia.
2. Then restart HAL and check the modifications appear among the
device options that you can check via the output of lshal. Typically:
[nicolas@munin ~]$ lshal | grep TrackPoint
info.product = 'TPPS/2 IBM TrackPoint' (string)
input.product = 'TPPS/2 IBM TrackPoint' (string)
3. Finally restart the X server and enjoy some nice and smooth vertical scrolling!
NDLR: once again, from the above extract you'll notice the FDI file does not enable horizontal scrolling... same reason as below: Firefox would understand it has a backward/forward instruction...
For reference, here is the original article on Thinkwiki.
I am also aware that it used to *not* work on earlier versions of evdev, so you'll have to make you run at least version 2.1.
0
Also, I find the middle button quite practical for scrolling. This can be configured via the xorg mouse input driver. Unfortunately, this is no longer possible with recent Linux distros (typically Fedora starting from version 9 or also Ubuntu from 8.10), the evdev driver is taking precedence, even though another driver is explicitly configured in xorg.conf (explanations from Red Hat developers can be found in this bug opened against Fedora 9). The correct solution is to disable this auto-detection by turning the "AutoAddDevices" server flag to "false".
Here are the relevant sections in my /etc/X11/xorg.conf:
Section "ServerFlags"
Option "AutoAddDevices" "false"
EndSection
Section "InputDevice"
Identifier "Trackpoint"
Driver "mouse"
Option "CorePointer"
Option "Device" "/dev/input/mice"
Option "Protocol" "ExplorerPS/2"
Option "Emulate3Buttons" "off"
Option "EmulateWheel" "on"
Option "EmulateWheelTimeOut" "200"
Option "EmulateWheelButton" "2"
Option "YAxisMapping" "4 5"
# Option "XAxisMapping" "6 7"
Option "ZAxisMapping" "4 5"
EndSection
Please note from the above that the middle button is only enabled for vertical scrolling. I'm barely using horizontal scrolling and it gets interpreted in Firefox as backwards/forwards which can get quickly annoying : ) Hence its being commented.
Posted on 4/26/2009 03:22:00 pm by Nicolas and filed under
fedora,
how-to,
linux,
open source,
trackpoint,
ubuntu,
X300
I've been asked recently my prefered settings for the pointing devices on Thinkpads... I'm addicted to the Trackpoint (the little red strawberry encrusted between the G, H and B keys) and the Trackpad (the flat sensitive surface also referred to as touchpad) generally disrupts me as I tend to accidentally touch it with the palm of my hand, so I generally disable it from the BIOS.Also, I find the middle button quite practical for scrolling. This can be configured via the xorg mouse input driver. Unfortunately, this is no longer possible with recent Linux distros (typically Fedora starting from version 9 or also Ubuntu from 8.10), the evdev driver is taking precedence, even though another driver is explicitly configured in xorg.conf (explanations from Red Hat developers can be found in this bug opened against Fedora 9). The correct solution is to disable this auto-detection by turning the "AutoAddDevices" server flag to "false".
Here are the relevant sections in my /etc/X11/xorg.conf:
Section "ServerFlags"
Option "AutoAddDevices" "false"
EndSection
Section "InputDevice"
Identifier "Trackpoint"
Driver "mouse"
Option "CorePointer"
Option "Device" "/dev/input/mice"
Option "Protocol" "ExplorerPS/2"
Option "Emulate3Buttons" "off"
Option "EmulateWheel" "on"
Option "EmulateWheelTimeOut" "200"
Option "EmulateWheelButton" "2"
Option "YAxisMapping" "4 5"
# Option "XAxisMapping" "6 7"
Option "ZAxisMapping" "4 5"
EndSection
Please note from the above that the middle button is only enabled for vertical scrolling. I'm barely using horizontal scrolling and it gets interpreted in Firefox as backwards/forwards which can get quickly annoying : ) Hence its being commented.
0
The relevant extract from the Release Notes reads:
Just to make it completely clear: the dontzap package is NOT installed by default, which means you will have to install it from the depots before enabling it!
Posted on 4/26/2009 09:13:00 am by Nicolas and filed under
gnome,
how-to,
linux,
open source,
ubuntu
Yes, apparently, they have done it, despite all the Linux fanatics shouting this would be a regression just to please newbies that are not familiar with it...The relevant extract from the Release Notes reads:
Ctrl-Alt-Backspace is now disabled, to reduce issues experienced by users who accidentally trigger the key combo. Users who do want this function can enable it in their xorg.conf, or via the command dontzap –disable.Well, at least there's a positive since you can install an additional package that will re-enable this powerful key combination to restart the X server when needed.
Just to make it completely clear: the dontzap package is NOT installed by default, which means you will have to install it from the depots before enabling it!
2
Quick update on the last post: the Thinkpad special keys are not all working. Basically, the ones that do work are the ones the are *directly* connected to the hardware: the Thinklight key, the volume keys, etc... The Fn+Fxx keys that are emulated via the X server have no effect, for instance the ones related to the screen brightness or the Fn+F2 to lock the session.
Taking the example of the brightness control keys, they appear configured in the X server mapping:
[nicolas@munin ~]$ xmodmap -pk|grep XF86MonBrightness
232 0x1008ff03 (XF86MonBrightnessDown) (...)
233 0x1008ff02 (XF86MonBrightnessUp) (...)
Experimenting with xev, it appears that the signals sent via the keys are indeed captured, i.e. the X server is aware that the special keys have been pressed and that the laptop should adjust the screen brightness accordingly... but still, nothing happens.
At the end of the day, the problem appears related to the way KDE interfaces with HAL (modern distros like Fedora 10 rely on it to configure the kernel input devices. Xorg in turn gets these key events through the evdev driver and will no longer try to take control of the input devices away from the kernel - NDLR).
Googling around, several bugs exists on various conbinations of KDE/kernel... but the good news is that the issue does not occur with GNOME. I've tested it with a Live Fedora distro, just to be sure, then opted to un-install KDE / install GNOME.
Taking the example of the brightness control keys, they appear configured in the X server mapping:
[nicolas@munin ~]$ xmodmap -pk|grep XF86MonBrightness
232 0x1008ff03 (XF86MonBrightnessDown) (...)
233 0x1008ff02 (XF86MonBrightnessUp) (...)
Experimenting with xev, it appears that the signals sent via the keys are indeed captured, i.e. the X server is aware that the special keys have been pressed and that the laptop should adjust the screen brightness accordingly... but still, nothing happens.
At the end of the day, the problem appears related to the way KDE interfaces with HAL (modern distros like Fedora 10 rely on it to configure the kernel input devices. Xorg in turn gets these key events through the evdev driver and will no longer try to take control of the input devices away from the kernel - NDLR).
Googling around, several bugs exists on various conbinations of KDE/kernel... but the good news is that the issue does not occur with GNOME. I've tested it with a Live Fedora distro, just to be sure, then opted to un-install KDE / install GNOME.
0
I've been the lucky owner of a Thinkpad x300 for a couple of weeks now... Brilliant ultra-portable laptop!! Just trying to summarize some of the installation/configuration steps I went through to get the machine working with my favourite softwares.
Almost everything worked out-of-the-box:
Hard disk password protection
Fingerprint reader
Wifi
Bluetooth
Webcam
Trackpoint/Touchpad
USB & USB mouse
Integrated keyboard light
DVD burner
Suspend/Hibernate
Then came configuration time...
1. Install Firefox
Then added my usual plugins: Adblock Plus, Foxmarks, LastPass
2. Configure SUDO so that my user is granted "superuser" authorizations and does not have to type in the root password each time
This was done via:
[nicolas@hector ~]$ su
Password:
[root@hector nicolas]# echo 'nicolas ALL=(ALL) NOPASSWD:ALL' >> /etc/sudoers
3. Setup YUM
For applications that are against Fedora licensing guidelines (typically MP3 and DVD players that will rely on proprietary formats), a 3rd party repository will have to be configured. For Fedora 10 this will be RPMFusion.
To set up the RPMFusion repositories:
[nicolas@hector ~]$ sudo rpm -ivh http://download1.rpmfusion.org/free/fedora/rpmfusion-free-release-stable.noarch.rpm
[nicolas@hector ~]$ sudo rpm -ivh http://download1.rpmfusion.org/nonfree/fedora/rpmfusion-nonfree-release-stable.noarch.rpm
[nicolas@hector ~]$ sudo rpm --import /etc/pki/rpm-gpg/RPM-GPG-KEY-rpmfusion-*
4. Media players
For the installation of MPLAYER through yum (RPMFusion enabled!):
[nicolas@hector TEMP]$ sudo yum install mplayer mplayer-gui gecko-mediaplayer mencoder
For VLC:
[nicolas@hector TEMP]$ sudo yum install vlc
5. Fonts
The "official" source for the Microsoft's TrueType fonts for Linuxes can be found here. Apparently, there's been a request for RPMFusion to include this package. But for the moment, you have to build your own RPM package using the msttcorefonts SPEC file provided by the above web site.
[nicolas@hector TEMP]$ sudo rpmbuild -bb msttcorefonts-2.0-1.spec
[nicolas@hector TEMP]$ sudo rpm -ivh $HOME/rpmbuild/RPMS/noarch/msttcorefonts-2.0-1.noarch.rpm
That said, Fedora encourages the use of the Liberation Fonts. They should get installed by default, but in case they're not, yum can install them:
[nicolas@hector TEMP]$ sudo yum install liberation-fonts
6. Adobe Flash
There's an option here. In short, the traditionnal way is to install the plugin nspluginwrapper as explained in the Fedora Wiki. That said, Adobe also offer an alpha version of a 64-bit plugin. Since it has been released a couple of months ago without any major issues being reported so far, I've opted for the latter. Full details can be found on the Adobe Labs web site.
Both installation methods gave good results on my machine. I've decided to stick with the alpha 64-bit package and installed the extracted libflashplayer.so to the system-wide /usr/lib64/mozilla/plugins/ rather than my user's ~/.mozilla/plugins/:
[nicolas@hector Download]$ ll libfl*
-rw-rw-r-- 1 nicolas nicolas 3729613 2009-03-27 08:28 libflashplayer-10.0.22.87.linux-x86_64.so.tar.gz
-rwxr-xr-x 1 nicolas nicolas 9543400 2009-02-03 04:03 libflashplayer.so
[nicolas@hector Download]$ sudo cp ./libflashplayer.so /usr/lib64/mozilla/plugins/libflashplayer.so
[nicolas@hector Download]$ ll /usr/lib64/mozilla/plugins/libfl*
-rwxr-xr-x 1 root root 9543400 2009-03-27 08:39 /usr/lib64/mozilla/plugins/libflashplayer.so
NB: T&C's from Adobe read as follows:
Important: Installing the Flash Player prerelease means you have accepted the terms of the Adobe Software License Agreement. This is prerelease software, not a final release.
Here's how the alpha 64-bit plugin displayed in Firefox:
File name: libflashplayer.so
Shockwave Flash 10.0 r22
7. Adobe Acrobat
To view PDF files, Fedora includes evince, however you may prefer to install the Adobe plugin.
This can be done via YUM after setting up the Adobe repository:
[nicolas@hector Download]$ sudo rpm -ivh
http://linuxdownload.adobe.com/adobe-release/adobe-release-i386-1.0-1.noarch.rpm
[nicolas@hector Download]$ sudo rpm --import /etc/pki/rpm-gpg/RPM-GPG-KEY-adobe-linux
[nicolas@hector Download]$ sudo yum install AdobeReader_enu
NB: Above steps are valid for the English version (the enu suffix). To list the different languages supported in Adobe's YUM repository, run the following command:
[nicolas@hector Download]$ yum list AdobeReader*
Other languages can be installed as above, just change the suffix of the AdobeReader package accordingly.
8. Sun Java
Once again, Fedora comes with a default OpenJDK, but you can download the Sun Java.
To do so, get the Java package from:
http://java.sun.com/javase/downloads/index.jsp
Select Java SE Runtime Environment (JRE) 6 Update 13 (or the full JDK). Then pick the "Linux x64" version. After that, select your language and view/accept the license agreement. On the next page, select the RPM option:
Java SE Runtime Environment 6u13
jre-6u13-linux-x64-rpm.bin 18.20 MB (64-bit users)
To install:
[nicolas@hector Download]$ sudo sh jre-6u13-linux-x64-rpm.bin
Finally, to setup the Sun JRE:
[nicolas@hector Download]$ sudo /usr/sbin/alternatives --install /usr/bin/java java /usr/java/default/bin/java 20000
The Mozilla browser plugin for 64-bit users:
[nicolas@hector Download]$ sudo /usr/sbin/alternatives --install /usr/lib64/mozilla/plugins/libjavaplugin.so libjavaplugin.so.x86_64 /usr/java/jre1.6.0_13/lib/amd64/libnpjp2.so 20000
NB: When updating the JRE package, simply download the newest RPM package and install as above. There will be no need to reset alternatives, as those settings should remain intact.
9. Virtual memory (VM) filesystems
There many good reasons to use tmpfs, Daniel Robbins summarized them brilliantly (and much better than I would...) on developerworks.
Additionally, for my personal use, I like the possibility to:
-clean up the content of tempfs filesystems at each reboot
-store sensible data (typically encryption keys) on such a transient media
-preserve my SSD life expectancy
By default with Fedora 10, /dev/shm is already a tmpfs. So I just add the following 2 lines to my /etc/fstab to make /tmp and /var/tmp two other ramdisk-like filesystems:
tmpfs /tmp tmpfs defaults,noatime,nodev,nosuid,mode=1777,size=1024M 0 0
tmpfs /var/tmp tmpfs defaults,noatime,mode=1777,size=512M 0 0
On my other laptop (with a traditional HD), the use of ramdisks FS increased the global performances of the machine. This is not guaranteed on an x300 with an SSD, but would have to be checked/confirmed.
Almost everything worked out-of-the-box:
Hard disk password protection
Fingerprint reader
Wifi
Bluetooth
Webcam
Trackpoint/Touchpad
USB & USB mouse
Integrated keyboard light
DVD burner
Suspend/Hibernate
Then came configuration time...
1. Install Firefox
Then added my usual plugins: Adblock Plus, Foxmarks, LastPass
2. Configure SUDO so that my user is granted "superuser" authorizations and does not have to type in the root password each time
This was done via:
[nicolas@hector ~]$ su
Password:
[root@hector nicolas]# echo 'nicolas ALL=(ALL) NOPASSWD:ALL' >> /etc/sudoers
3. Setup YUM
For applications that are against Fedora licensing guidelines (typically MP3 and DVD players that will rely on proprietary formats), a 3rd party repository will have to be configured. For Fedora 10 this will be RPMFusion.
To set up the RPMFusion repositories:
[nicolas@hector ~]$ sudo rpm -ivh http://download1.rpmfusion.org/free/fedora/rpmfusion-free-release-stable.noarch.rpm
[nicolas@hector ~]$ sudo rpm -ivh http://download1.rpmfusion.org/nonfree/fedora/rpmfusion-nonfree-release-stable.noarch.rpm
[nicolas@hector ~]$ sudo rpm --import /etc/pki/rpm-gpg/RPM-GPG-KEY-rpmfusion-*
4. Media players
For the installation of MPLAYER through yum (RPMFusion enabled!):
[nicolas@hector TEMP]$ sudo yum install mplayer mplayer-gui gecko-mediaplayer mencoder
For VLC:
[nicolas@hector TEMP]$ sudo yum install vlc
5. Fonts
The "official" source for the Microsoft's TrueType fonts for Linuxes can be found here. Apparently, there's been a request for RPMFusion to include this package. But for the moment, you have to build your own RPM package using the msttcorefonts SPEC file provided by the above web site.
[nicolas@hector TEMP]$ sudo rpmbuild -bb msttcorefonts-2.0-1.spec
[nicolas@hector TEMP]$ sudo rpm -ivh $HOME/rpmbuild/RPMS/noarch/msttcorefonts-2.0-1.noarch.rpm
That said, Fedora encourages the use of the Liberation Fonts. They should get installed by default, but in case they're not, yum can install them:
[nicolas@hector TEMP]$ sudo yum install liberation-fonts
6. Adobe Flash
There's an option here. In short, the traditionnal way is to install the plugin nspluginwrapper as explained in the Fedora Wiki. That said, Adobe also offer an alpha version of a 64-bit plugin. Since it has been released a couple of months ago without any major issues being reported so far, I've opted for the latter. Full details can be found on the Adobe Labs web site.
Both installation methods gave good results on my machine. I've decided to stick with the alpha 64-bit package and installed the extracted libflashplayer.so to the system-wide /usr/lib64/mozilla/plugins/ rather than my user's ~/.mozilla/plugins/:
[nicolas@hector Download]$ ll libfl*
-rw-rw-r-- 1 nicolas nicolas 3729613 2009-03-27 08:28 libflashplayer-10.0.22.87.linux-x86_64.so.tar.gz
-rwxr-xr-x 1 nicolas nicolas 9543400 2009-02-03 04:03 libflashplayer.so
[nicolas@hector Download]$ sudo cp ./libflashplayer.so /usr/lib64/mozilla/plugins/libflashplayer.so
[nicolas@hector Download]$ ll /usr/lib64/mozilla/plugins/libfl*
-rwxr-xr-x 1 root root 9543400 2009-03-27 08:39 /usr/lib64/mozilla/plugins/libflashplayer.so
NB: T&C's from Adobe read as follows:
Important: Installing the Flash Player prerelease means you have accepted the terms of the Adobe Software License Agreement. This is prerelease software, not a final release.
Here's how the alpha 64-bit plugin displayed in Firefox:
File name: libflashplayer.so
Shockwave Flash 10.0 r22
7. Adobe Acrobat
To view PDF files, Fedora includes evince, however you may prefer to install the Adobe plugin.
This can be done via YUM after setting up the Adobe repository:
[nicolas@hector Download]$ sudo rpm -ivh
http://linuxdownload.adobe.com/adobe-release/adobe-release-i386-1.0-1.noarch.rpm
[nicolas@hector Download]$ sudo rpm --import /etc/pki/rpm-gpg/RPM-GPG-KEY-adobe-linux
[nicolas@hector Download]$ sudo yum install AdobeReader_enu
NB: Above steps are valid for the English version (the enu suffix). To list the different languages supported in Adobe's YUM repository, run the following command:
[nicolas@hector Download]$ yum list AdobeReader*
Other languages can be installed as above, just change the suffix of the AdobeReader package accordingly.
8. Sun Java
Once again, Fedora comes with a default OpenJDK, but you can download the Sun Java.
To do so, get the Java package from:
http://java.sun.com/javase/downloads/index.jsp
Select Java SE Runtime Environment (JRE) 6 Update 13 (or the full JDK). Then pick the "Linux x64" version. After that, select your language and view/accept the license agreement. On the next page, select the RPM option:
Java SE Runtime Environment 6u13
jre-6u13-linux-x64-rpm.bin 18.20 MB (64-bit users)
To install:
[nicolas@hector Download]$ sudo sh jre-6u13-linux-x64-rpm.bin
Finally, to setup the Sun JRE:
[nicolas@hector Download]$ sudo /usr/sbin/alternatives --install /usr/bin/java java /usr/java/default/bin/java 20000
The Mozilla browser plugin for 64-bit users:
[nicolas@hector Download]$ sudo /usr/sbin/alternatives --install /usr/lib64/mozilla/plugins/libjavaplugin.so libjavaplugin.so.x86_64 /usr/java/jre1.6.0_13/lib/amd64/libnpjp2.so 20000
NB: When updating the JRE package, simply download the newest RPM package and install as above. There will be no need to reset alternatives, as those settings should remain intact.
9. Virtual memory (VM) filesystems
There many good reasons to use tmpfs, Daniel Robbins summarized them brilliantly (and much better than I would...) on developerworks.
Additionally, for my personal use, I like the possibility to:
-clean up the content of tempfs filesystems at each reboot
-store sensible data (typically encryption keys) on such a transient media
-preserve my SSD life expectancy
By default with Fedora 10, /dev/shm is already a tmpfs. So I just add the following 2 lines to my /etc/fstab to make /tmp and /var/tmp two other ramdisk-like filesystems:
tmpfs /tmp tmpfs defaults,noatime,nodev,nosuid,mode=1777,size=1024M 0 0
tmpfs /var/tmp tmpfs defaults,noatime,mode=1777,size=512M 0 0
On my other laptop (with a traditional HD), the use of ramdisks FS increased the global performances of the machine. This is not guaranteed on an x300 with an SSD, but would have to be checked/confirmed.
0
If like me you appreciate fast menus, with no delay at the opening, then here is a little tip you may find useful. By default, GNOME menus appear with a short delay. To get rid of this, add the parameter in your .gtkrc-2.0 file.
For instance, from a terminal:
cd
touch .gtkrc-2.0
echo "gtk-menu-popup-delay = 0"| tee -a .gtkrc-2.0
Finally, restart your session (typically CTRL + ALT + BACKSPACE). You should notice a nice speed boost when browsing any GNOME menu.
For instance, from a terminal:
cd
touch .gtkrc-2.0
echo "gtk-menu-popup-delay = 0"| tee -a .gtkrc-2.0
Finally, restart your session (typically CTRL + ALT + BACKSPACE). You should notice a nice speed boost when browsing any GNOME menu.
0
A quick one today...
Just to show how simple is software management under Linux. This morning, during the first login on my Unbuntu 7.10 Desktop, it appeared that I had to update one of the installed software packages.
This was indeed the updated DST (BTW, we moved the clock forward this morning), as confirmed when I opened the notification:

After that, you just have to click "Install updates" and Synaptic will do the rest:

Close the window once finished...
Job done!
Did I mention you do not have to reboot? ; )
Is that not as easy as it can get?
PS: there will probably be more of this sort of Ubuntu-related topics since I'm very happy with my T43 Ubuntu Desktop... so if you're interested in Linux, open-source or just curious of how Ubuntu can run on an IBM Thinkpad, then watch this space...
Just to show how simple is software management under Linux. This morning, during the first login on my Unbuntu 7.10 Desktop, it appeared that I had to update one of the installed software packages.
This was indeed the updated DST (BTW, we moved the clock forward this morning), as confirmed when I opened the notification:

After that, you just have to click "Install updates" and Synaptic will do the rest:

Close the window once finished...
Job done!
Did I mention you do not have to reboot? ; )
Is that not as easy as it can get?
PS: there will probably be more of this sort of Ubuntu-related topics since I'm very happy with my T43 Ubuntu Desktop... so if you're interested in Linux, open-source or just curious of how Ubuntu can run on an IBM Thinkpad, then watch this space...
